In this post, I will explore the possibility of leveraging NSX-T Principal Identities in lieu of a proper object-based RBAC functionality not available in the current 2.4 version. This solution may be appealing in some multi-tenant scenarios.
What is multitenancy?
Since I started working at VMware, I learned that any time I talk about multitenancy with someone, we need to first align our definitions of it. When I worked in the networking silo, there was little room for incomprehension. A multitenant network was a network that would allow for overlapping IPs while sharing the same physical equipment. The unspoken assumption was that the network was centrally managed by a team or an external party acting as the service provider. The concept of self-service management was far removed from my array of common deployment possibilities.
Then came Cloud Management Platforms, SDNs, and IaaS to change my perspective of what multitenancy could mean. Some example of multitenant solution could be:
- A dedicated SDDC per tenant. Each tenant has its own dedicated management stack (vCenter, NSX, vRA, PKS…) operated by the customer or the service provider operations team. Think about the VMConAWS model.
- A shared SDDC managed by the service provider where different tenants workloads run on the same infrastructure. Overlapping IPs are not required because the service provider manages the IP allocation of the workloads enforcing no communication happens between the tenants via the NSX edge or distributed firewall. Think about a managed service offering.
- A shared SDDC where the tenants are allowed to bring their own IPs and self manage their own logical topologies. This is probably close to the Public Cloud or OpenStack model.
In this post, I would like to explore the latter scenario in the context of NSX-T in an on-prem deployment.
So, what’s the problem?
NSX-T provides a variety of tools to address the third scenario.
- Different tenant workloads can be connected to different segments to provide layer 2 separation.
- Different logical routers can be implemented to support overlapping IPs in conjunction with NAT when traffic needs to be forwarded over shared links such as the Internet or the Enterprise WAN.
- Edge and distributed firewalls can ensure workloads from two different tenants can’t see each other even if they are running on the same host and belong to the same IP range.
- NSX-T implements a two-tier routing architecture that facilitates the onboarding of new tenants by decoupling the tenant-specific logical topology from the physical network.
What NSX-T does not provide out of the box is a way for the different tenant admins to manage their own constructs (routers, load balancer, distributed firewall sections, etc.) without interfering with one another. It means that NSX-T capabilities are ideal for addressing scenarios 1 and 2. When we need to address the self-service capabilities of scenario 3 tough, we are usually required to introduce a cloud management platform or another external layer of automation where infrastructure multi-tenancy can be enforced at the management layer.
NSX-T Role Base Access Control (RBAC)
While vSphere provides very granular RBAC capabilities, which can be used to give specific permissions to certain users on certain objects, the NSX-T RBAC model is more static. In NSX-T version 2.4, we have 10 predefined user roles whose permissions cannot be modified. You can find the detailed permissions here. On top of that those permissions are not object-specific. A user with the network engineer role has full access to any logical router. There is no way to have one user have management control of one logical router and another user of a different logical router. If a user is allowed to manage one logical router, it will be able to control any other logical router in the system. Also to be considered, the creation of additional users other than admin is only possible when VMware Identity Manager (vIDM) has been integrated with NSX-T.
Principal Identities Overview
Principal Identities (PI) are unique users in NSX-T who can create an object and ensure that the object can only be modified or deleted by the same identity. Authentication of PIs is only supported via client certificate, authentication is local to NSX-T Manager so it does not require vIDM, and it’s possible to assign a predefined RBAC role to the PI. Principal Identities are generally leveraged by third-party applications or cloud management platforms such as Openstack, PKS, or vRA to ensure that an admin does not modify the NSX-T configuration generating a mismatch between their view of the NSX environment and its actual configuration.
Even if they were not designed for this use case, I wanted to explore if PIs could be leveraged to segment the NSX-T management plane between different users. For example, creating multiple principal identities with the network engineer role should allow each PI to manage its own logical routers without interfering with one another.
Creating a Principal Identity
To create a principal identity, we need to:
- Generate a Client Certificate and Private Key
- Create the PI in NSX Manager and associate to it an RBAC role and the certificate we just created
The process can be a little cumbersome and error-prone, especially the first time you go through it. To make it easy on yourself, you can use this script to automate the PI creation on a Linux machine with OpenSSL and jq installed. You just need to edit the parameters at the beginning of the file: NSX Manager FQDN/IP, the name of the Principal Identity, and its role. The script will prompt you for the NSX admin user password.
NSX_MANAGER="nsxmgr-01a"
NSX_USER="admin"
PI_NAME="neteng"
PI_ROLE="network_engineer"
The script will generate two files, a certificate and a private key file that we will use to authenticate our API calls to NSX Manager. PIs can only be used via the API, they cannot be used through the UI, so all our configuration must be performed through the NSX API or a tool that allows for client certificate authentication.
Choosing a tool to perform our configurations
While making straight API calls to the NSX Manager API is undoubtedly an option, it is not something I would rely on if implementing this solution at scale. The first tool I considered to simplify the NSX API consumption was Terraform. It seemed like an ideal option. Each tenant could own its own Terraform configuration file where they would define their desired configuration in a declarative manner. They would not have to deal with the intricacy of the NSX API when configuring advanced services such as edge firewall or load balancing. Configuring client certificate authentication in Terraform is also a breeze, it is enough to specify the path our client certificate and private key in the NSX-T provider. See below.
# Configure the VMware NSX-T Provider
provider "nsxt" {
  host                 = "${var.nsx_ip}"
  client_auth_cert_file = "../superuser.crt"
  client_auth_key_file  = "../superuser.key"
  allow_unverified_ssl = true
}
Everything was working great in my tests until I realized that Terraform requires the PI to have the Enterprise Admin role assigned. Any other role would not work even if the Terraform resources I was specifying were within the boundary of that role. I guess it depends on the NSX-T Terrfaorm provider implementation, which pulls information about a variety of objects before implementing any configuration change. So is Terraform usable at all in this scenario? It depends. If the tenants are “friendly” and you do not need hard enforcement of the configuration boundaries rather than a way to reduce the probability of a configuration mistake, it might be viable. Keep in mind a tenant could use its credentials outside of Terraform to perform Enterprise Admin actions such as…. unlock objects owned by another PI and delete it or even uninstalling NSX-T from a cluster. All things considered, I did not think it was worth exploring the solution with Terraform any further. Luckily NSX-T provides its own built-in tool with much of the same attributes and advantages as Terraform, the NSX-T Policy API.
NSX-T Policy API with Principal Identities
For this use case, I think it is appropriate to use the Policy API hierarchical model so that each tenant can specify its desired configuration in a JSON data structure and submit it to the NSX Policy engine. When changes are required, it is enough to modify the JSON file and submit it again. It means that each tenant will have to maintain its own independent view of the desired state in a JSON file including backing it up. If the intent file is lost, it is possible to rebuild it from the NSX Policy API filtering the objects created by that tenant, but it is not trivial, so protecting the intent file appropriately is a good idea. Once the desired configuration is ready in the Policy API JSON format, we can pass it as the body in a PATCH call using the client certificate and private key for authentication. This example uses the certificate and the key files we created when adding the Principal Identity via script to deploy a T1 gateway. The new T1 Gateway has 3 downlink interfaces and is connected to an existing T0 Gateway. If we retrieve the T1 Gateway object via a GET call, we can see that the object is protected and was created, and as a consequence owned, by our Principal Identity.
GET https://nsxmgr-01a.corp.local/policy/api/v1/infra/tier-1s/t1-tenant2

{
  "tier0_path": "/infra/tier-0s/t0-sitea",
  "failover_mode": "NON_PREEMPTIVE",
  "force_whitelisting": false,
  "default_rule_logging": false,
  "disable_firewall": false,
  "resource_type": "Tier1",
  "id": "t1-tenant2",
  "display_name": "t1-tenant2",
  "description": "tenant-2 gateway",
  "path": "/infra/tier-1s/t1-tenant2",
  "relative_path": "t1-tenant2",
  "parent_path": "/infra/tier-1s/t1-tenant2",
  "marked_for_delete": false,
  "_create_user": "ne100",
  "_create_time": 1567664763096,
  "_last_modified_user": "ne100",
  "_last_modified_time": 1567664763148,
  "_system_owned": false,
  "_protection": "REQUIRE_OVERRIDE",
  "_revision": 1
}
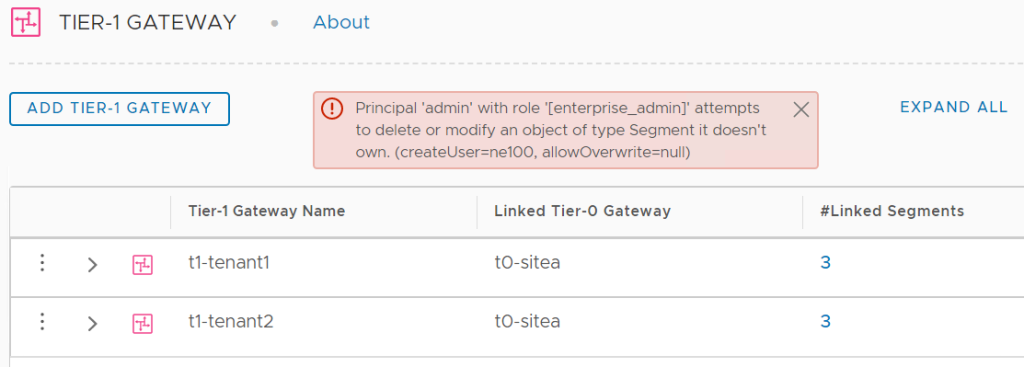
An Enterprise Admin, PI or not, could delete the object via API adding the header ‘X-Allow-Overwrite = true’ to the DELETE API call. Trying to delete the object via UI, even with Enterprise Admin privileges, will fail as shown below. This is what I got when I tried to remove the t2-tenant1 Gateway.
It is interesting to note that the object protection happens at the Policy API layer and not at the Management API layer. The Policy API engine uses its own Principal Identity to interact with the Management plane API. We should not forget that even if the policy engine runs on the NSX Manager, it is an external application from the NSX management plane perspective. The Policy Engine locks all the objects it creates using the nsx_policy PI.

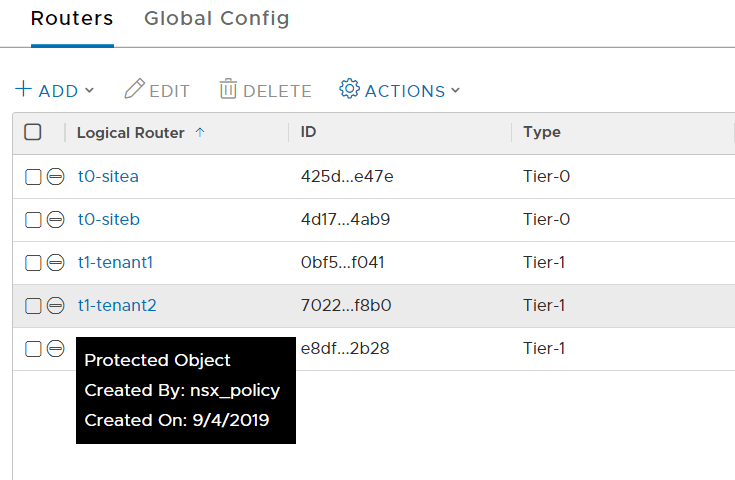
If we look in the Advanced Networking and Security Tab, two routers created via Policy API by two different tenant PIs are locked by the same entity, the nsx_policy PI.
What about shared objects?
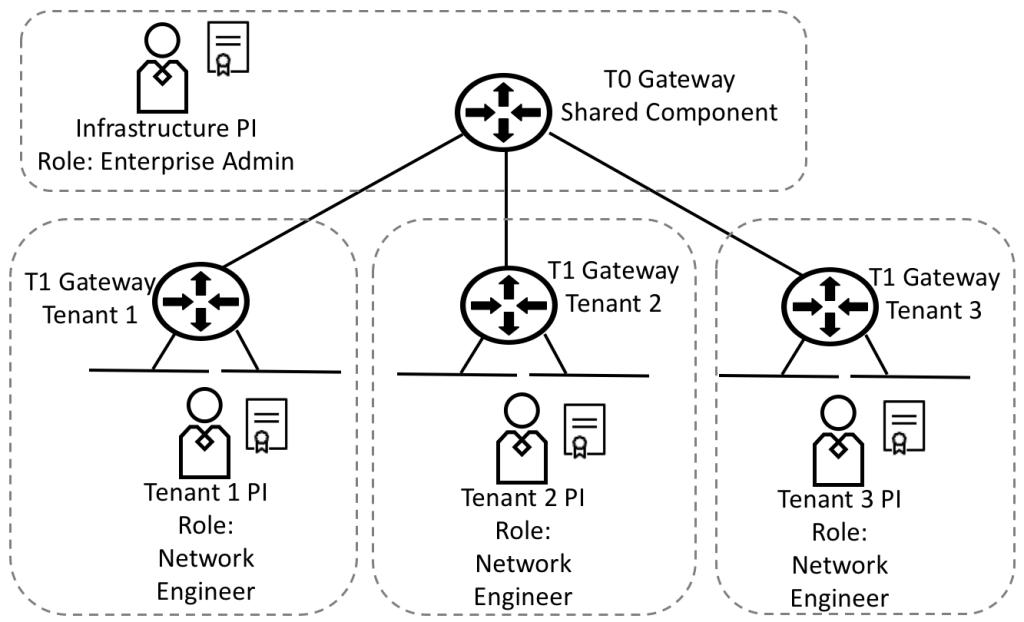
Shared objects are those infrastructure components that are not specific to any tenant but that every tenant may leverage. A simple example could be the T0 Gateway that we used to interconnect our tenant T1 gateway. Other tenants could interconnect their T1 Gateway to the same T0. Because our tenant Princip Identity as been created with the network engineer role, it has full access to any logical router object that is not protected. It means that while it cannot modify or delete another tenant router protected by another tenant PI, it could harm the shared infrastructure modifying the T0 configuration. For this reason, any shared object accessible by the tenant PI based on their RBAC profile should be created by a PI, most likely having Enterprise Admin privileges.
Conclusions
The configurations presented in this post are not what I would consider a validate solution but just an exercise to investigate what is possible within the current boundaries of the NSX-T platform. Still, it is remarkable to see how a niche feature such as Principal Identities, could be potentially leveraged for sophisticated use cases thanks to the introduction of the Policy API. Without the Policy API, while still possible to implement the described solution via direct API calls to the management plane, the level of complexity would have been too high to make the solution viable unless a significant investment in automation was possible.
If you made it to this point, thanks for reading. This was a rather complex blog post, please do not hesitate to post any question in the comments or reach out on social media.

Very useful post!!
LikeLike
Very well explained. It helped me understand why PI is introduced in NSX-T
LikeLike